



INDICATOR · BEGINNER GUIDE
FAIR VALUE GAPS
Shades the empty gaps price jumped over in a hurry, scores each out of 100, and shows which gaps price may revisit.
◆Gaps scored out of 100◆Adds 1H and 4H gaps◆Zones shrink as they fill◆Areas to watch, not signals
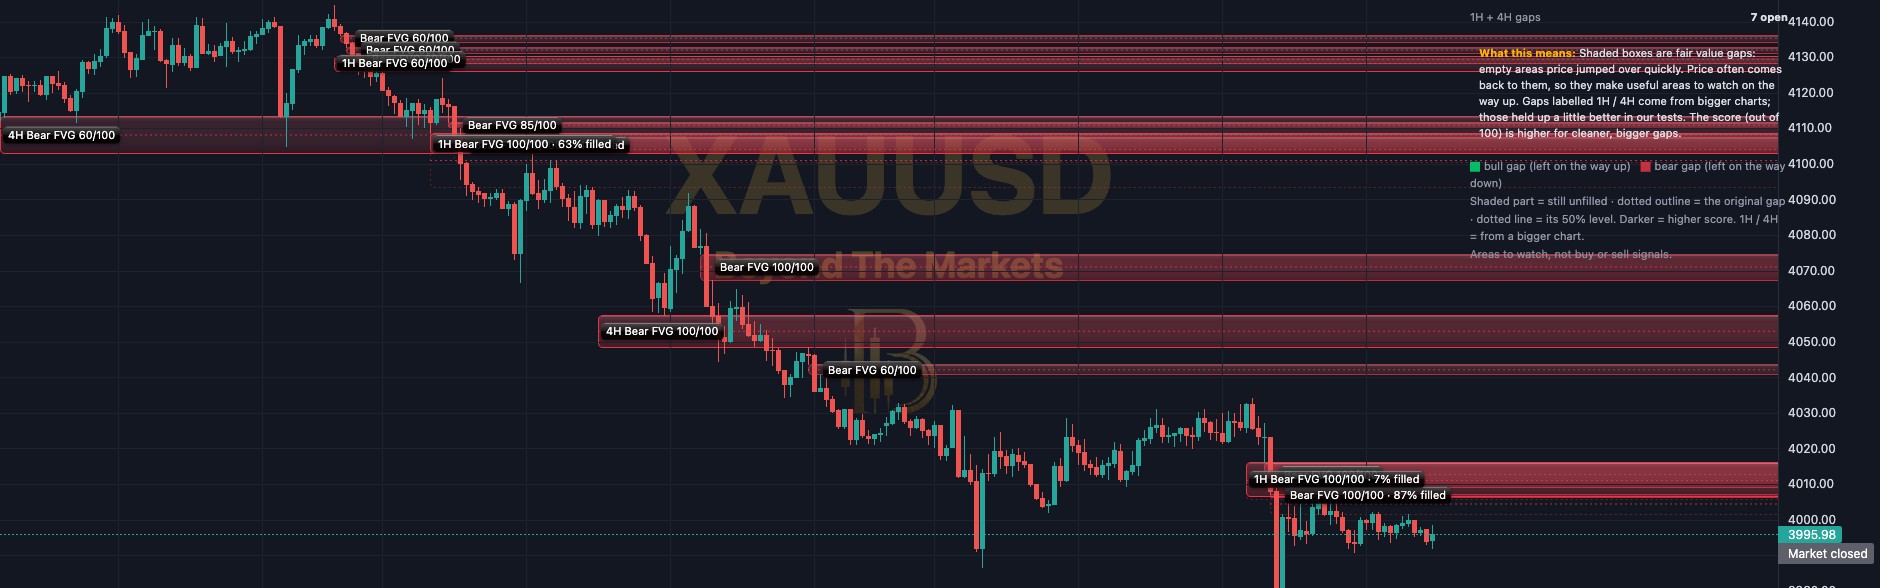 WHAT YOU SEE · GOLD 15m · A FALLING WEEK, SO RED GAPS
23456
1Green box: a bullish gap, left on the way up. Some traders watch it as a floor.
2Red box: a bearish gap, left on the way down. Some traders watch it as a ceiling.
3Score label: how clean the gap is, out of 100. Only gaps scoring 60 or more are drawn.
4Shrinking box: the shaded part is what is still unfilled. Once price fills it right through, it disappears.
5Dotted middle line: the 50% level of the gap. Many traders watch the middle.
61H / 4H gaps: gaps from a bigger chart, drawn on this one. 4H gaps held up a little better in testing.
Use it in 5 steps
- Switch it onOpen Charts → Basic Indicators → tick Smart Fair Value Gaps. On smaller charts, gaps from the 1H and 4H charts are added for you.
- Find the nearest gapsThe dashboard lists the Nearest above and Nearest below. Green below price may act as a floor, red above as a ceiling.
- Watch price come backWhen price returns into a gap, watch whether it holds and bounces or slices through. The dotted 50% line is a common reaction point.
- Wait for proofA gap is an area, not a signal. Wait for a candle to close and turn away from it, in the direction of the trend.
- Favour bigger gapsPrefer 4H gaps. Put your stop loss beyond the far edge of the gap, so a fill-through takes you out small.
A gap up close
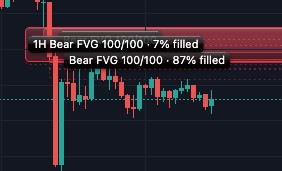
Gold 15m, 23 Oct. Price bounced back up into two red gaps. The labels show how much of each is filled: 7% of the 1H gap, 87% of the smaller one.
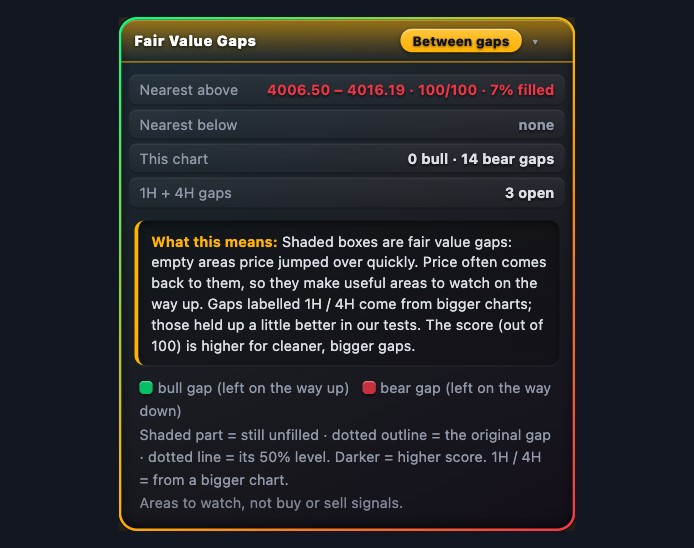
The dashboard
- Status pill: where price is now: inside a gap, Between gaps, or No open gaps.
- Nearest above / below: the closest open gap each side, its price range, score and how much is filled.
- This chart: how many bull and bear gaps are open. 1H + 4H gaps: how many bigger-chart gaps are open.
- What this means: a plain-English read of the situation, including how the gaps did in testing.
- Click the title bar to hide it. Drag it by its grip to move it.
Golden rules
- Areas to watch, not signals. In testing, gaps held only a little more often than any area of the same size.
- A high score is not a win rate. It mostly means a bigger, cleaner gap.
- Never skip the stop loss. Risk 1% of your account or less per trade.
- Practise first with the Replay button: play old candles forward and watch how price treats the gaps.
🔔 Get told when it fires: click Alerts (the bell), choose Smart Fair Value Gaps and tick “New bullish FVG” or “New bearish FVG”.
For educational purposes only. The results in this guide come from testing on past prices. Past performance does not guarantee future results, and real spreads, slippage and delays can make results worse. Nothing here is financial advice, and trading carries a high risk of losing money. Read the risk warning.